| HIFI-FORUM » Fernseher & Beamer » Projektoren / Beamer » Leinwände, Beamerzubehör, Messtechnik & Co. » Der große LightSpace CMS/HCC Info, Tips und Tricks... | |
|
|
||||
Der große LightSpace CMS/HCC Info, Tips und Tricks + Diskussionsthread+A -A |
||||||
| Autor |
| |||||
|
black_eagle
Inventar |
#1
erstellt: 23. Jun 2013, 18:11

|
|||||
|
Moin moin an alle ambitionierten Kalibrierer da draußen und die de es noch werden wollen. Da viele hier schon viel Erfahrung mit CalMAN , HCFR und Chroma Pure haben. Wollte ich mit dem Thread endlich mal den nächsten Step wagen! Es gibt die Möglichkeit, sein Ausgabegerät auf bis zu 17^3 Farben zu profilieren. Das geht mit einer Profisoftware, die namhafte Studios wie Warner Brothers, Sony Pictures, Disney Pictures und andere Verwenden. Tatsächlich soll der Standard beim Mastering der Blurays 17^3 Farben. Ich wollte gerne in den Thread viele Fragen klären lassen und die Profis Nudgiator, Noodles73und Master468 einladen hier ein par Grundlegende Sachen zu klären. Dabei bitte ich Master468(Dennis) insbesondere nicht so fachmännisch zu philosophieren, da der Thread Anfänger nicht abschrecken soll, sondern eher aufzeigen warum man kalibriert und was die Vorteile gegenüber CalMAN und HCFR ist. Selbstverständlich sind phoenix0870 norbert.s olewed frsa und andere aufgefordert hier mit zu diskutieren! Meine erste Frage ist, kann man einen Panasonic ab der VT30 Serie eigentlich profilieren ohne einen Video Prozessor zu benützen? Oder ist zumindest ein eeColor pflicht? Nun feuer Frei! |
||||||
|
Nudgiator
Inventar |
#2
erstellt: 23. Jun 2013, 18:21

|
|||||
"Profilieren" kannst Du jedes Zielgerät (ohne Videoprozessor), aber Du benötigst noch eine 3D-LUT-Box (oder etwas ähnliches), um die LUT zu "speichern". Das Zielgerät muß auch in der Lage sein, die LUT-Daten zu verarbeiten. Zusätzlich ist natürlich ein Messkopf und LightSpace CMS Pflicht. CalMAN kann nicht profilieren, da ein gänzlich anderes Konzept benutzt wird.
Es gibt durchaus Zielgeräte, die dafür geeignet sind. Diese sind aber (noch) sehr teuer. Die Pana-TVs benötigen zwingend eine LUT-Box in Form eines Lumagen Radiance oder eben eine eeColorBox. Es gibt noch ein paar andere Anbieter. Deren LUT-Boxen sind aber für den Otto-Normal-User nahezu unerschwinglich. [Beitrag von Nudgiator am 23. Jun 2013, 18:27 bearbeitet] |
||||||
|
|
||||||
|
black_eagle
Inventar |
#3
erstellt: 23. Jun 2013, 18:26

|
|||||
|
Jetzt mal blöd gefragt, was an den sündhaft teueren LUT-Boxen ist besser als ein eeColor, der am günstigesten ist  Oder ist das eine total andere Zielgruppe? [Beitrag von black_eagle am 24. Jun 2013, 08:34 bearbeitet] |
||||||
|
Nudgiator
Inventar |
#4
erstellt: 23. Jun 2013, 18:30

|
|||||
Die eeColorBox ist auf das Wesentlichste beschränkt. Ein z.B. Davio hat eine bessere Ausstattung und zusätzliche Features.
Zum Teil: ja ! |
||||||
|
Guido57
Neuling |
#5
erstellt: 24. Jun 2013, 16:21

|
|||||
|
Welche Version von Light Space empfiehlt für das Kalibrieren mit der eeColor Box?  |
||||||
|
black_eagle
Inventar |
#6
erstellt: 24. Jun 2013, 16:40

|
|||||
|
Soweit ich weiß, für den Heimgebrauch.. die LightSpace HCC - Home Cinema Calibration. |
||||||
|
Nudgiator
Inventar |
#7
erstellt: 24. Jun 2013, 16:42

|
|||||
|
Die HCC-Version ist speziell für Heimkinouser und reicht daher vollkommen aus. |
||||||
|
black_eagle
Inventar |
#8
erstellt: 24. Jun 2013, 16:58

|
|||||
|
Hat jemand eine Ahnung wo man ein EODIS3 und i1Pro2 beide OEM am günstigsten bekommt? Nudgiator hast du schon Hardware bei Light Illusion geordert? Und wenn ja.. wie sind da die Versandkosten? Und was ist mit VAT? 375GBP für ein eeColor lesen sich ganz gut  |
||||||
|
Nudgiator
Inventar |
#9
erstellt: 24. Jun 2013, 17:19

|
|||||
Bei SpectraCal.
Nein, ich habe dort keine Hardware geordert, kenne aber die Preise. Die Gerätschaften werden i.d.R. direkt vom Hersteller per UPS geliefert. UPS ist extrem zuverlässig und vorsichtig, aber die Versandkosten sind der Horror: 97 GBP ! LI kann nix dafür, UPS ist nun einmal so teuer  Die VAT beträgt aus GBP 20%. Die VAT beträgt aus GBP 20%.
Die Gesamtsumme beträgt: (375 GBP (eeColor) + 97 GBP (Versand)) * 1,2 (VAT) = 566,4 GBP. In Euro: 666,6€ |
||||||
|
TX50VT20E
Stammgast |
#10
erstellt: 19. Sep 2013, 12:36

|
|||||
|
Ich habe aktuell bei Illusion bezahlt: Pfund 225 X-Rite i1 Display Pro OEM Pfund 52 Shipping Pfund 277 Subtotal Pfund 55,40 VAT 20% Pfund 332,40 TOTAL Pfund 665 X-Rite i1 Pro 2 OEM Pfund 74 Shipping Pfund 739 Subtotal Pfund 147,80 VAT 20% Pfund 886,80 TOTAL Zusammen Pfund 1219,20 Das wird aus USA direkt von xrite versendet und daher auch nicht beides zusammen in einem Paket. Der Grund ist einfach, die beiden Pakete sind wirklich auf den jeweiligen Sensor ausgelegt, da passt nichts extra rein in den Karton. Bitte beachte, dass Du ca. 20 Pfund handeln kannst, wenn Du mitteilst, dass Du vorab überweist, also per Bank. In diesem Falle beachte, dass Du den Umrechnungskurs korrekt wählst! Am besten sollte Dir Dein Bankansprechpartner den Endbetrag ausrechnen. Dies sind aktuell keineswegs 1454,51 Euro, sondern "in Hundert" 3,5 % mehr, also 1454,51 / 96,5 * 100 = 1507,26 Euro Die Empfängerhausbank bei Illusion berechnet bei der Umrechnung von Euro in Pfund 3,5% (!), diese werden dort abgezogen, sollten also vorher mitgezahlt werden. Entweder Du überweist in der EU kostenlos in Euro und rechnest den Betrag hoch, oder Du bezahlts bei Deiner Bank mit Gebühren exakt in Pfund und zahlst das, was Deine Bank Dir dann berechnet. Der X-Rite i1 Pro 2 OEM kommt übrigens in einem passenden Koffer! Warum EU? Bezahlt wird an Illusion in England, die Ware kommt aus USA... [Beitrag von TX50VT20E am 19. Sep 2013, 12:37 bearbeitet] |
||||||
|
Nudgiator
Inventar |
#11
erstellt: 19. Sep 2013, 12:56

|
|||||
|
Ich hab direkt in EURO über meine Bank in D überwiesen. Meine Bank hat um die 30€ an Gebühren verlangt - für alles (inkl. der englischen Bankgebühren). Bei SpectraCal mußte man vor über einem Jahr ca. 230 USD + 35 USD Versandkosten für den EODIS3 zahlen zzgl. 19% MwSt. Dann noch 12€ für die Zollabwicklung. Macht in Summe etwa 210€ + 12€ = 222€. Wobei der Umrechnungskurs bei ca. 1,5€ lag. |
||||||
|
TX50VT20E
Stammgast |
#12
erstellt: 19. Sep 2013, 14:12

|
|||||
|
Ja, aber jetzt macht man dies online (bei Onlinebanking) über eine SEPA/Euro-Überweisung. Diese ist ebenfalls in Euro, dies ist dann aber auch das Problem. Ich hätte dies gerne in Pfund, dann wäre aber der Witz weg... Ich kann dort kein Pfund angeben, es ist in Euro, Die Überweisung ist für mich völlig kostenlos, dies IST das Problem. Ich muss also die Kosten auf der Seite von Illusion kennen... die soll ich ja ebenfalls zahlen... Ich habe mich um die 3,5% vertan... Illusion behauptete danach, es wäre alles ok, Sie hätten in USA am Porto gespart und dies wäre dann alles sauber... Dies war jedoch eine nette Lüge... 2 Pakete bleiben 2 Pakete... Dies wurde mir also geschenkt. War mir etwas unangenehm. [Beitrag von TX50VT20E am 19. Sep 2013, 14:12 bearbeitet] |
||||||
|
TX50VT20E
Stammgast |
#13
erstellt: 19. Sep 2013, 14:16

|
|||||
|
Als ich den 2021 bezahlt habe, habe ich den selben Unsinn gemacht... Er hat sich ebenfalls aus purer Höflichkeit ebenfalls nicht beschwert... Ich weis jetzt aber, dass dies nicht ok ist. In diesem Falle muss mir meine Bank sagen, wieviel ich überweisen muss in Euro, damit bei der Zielbank 100% ankommt... |
||||||
|
Nudgiator
Inventar |
#14
erstellt: 19. Sep 2013, 16:52

|
|||||
|
Ich habe per Auslandsüberweisung (NICHT SEPA !) direkt online in GBP über meine Bank bezahlt (da kannst Du die Zielwährung frei wählen). Die Bank hat dann zum aktuellen Kurs den Betrag in EURO von meinem Konto abgebucht. Dort konnte ich auch wählen, wer die Überweisungskosten übernimmt: 1. Ich trage sämtliche Kosten (also die Kosten meiner Bank und der Empfängerbank) 2. Der Empfänger trägt sämtliche Kosten (also die Kosten meiner Bank und der Empfängerbank) 3. Die Kosten weden geteilt Die Bank verlangt dann (bei Punkt 2) 0,3% vom Geldbetrag, mindestens aber um die 21€ an Gebühren. Bei mir waren das ca. 30€. Das hat die Bank direkt mit berücksichtigt und mit abgebucht. |
||||||
|
TX50VT20E
Stammgast |
#15
erstellt: 20. Sep 2013, 07:09

|
|||||
|
Ja, England gehört halt nicht wirklich zur EU... |
||||||
|
SiggiUA
Hat sich gelöscht |
#16
erstellt: 20. Sep 2013, 10:23

|
|||||
Doch! Nur nicht zur Euro Zone und nicht zu Schengen. Dagegen gibt es auch Länder, die zu Schengen gehören, aber nicht EU Mitglieder sind (z.B. CH). Das sind alles separate Abkommen, die sich nicht gegenseitig bedingen. Gruß Siggi [Beitrag von SiggiUA am 20. Sep 2013, 10:24 bearbeitet] |
||||||
|
TX50VT20E
Stammgast |
#17
erstellt: 20. Sep 2013, 11:59

|
|||||
|
Das wird natürlich helfen. |
||||||
|
*Harry*
Inventar |
#18
erstellt: 19. Feb 2014, 15:27

|
|||||
|
Hatte auch schon 2x das Vergnügen, an Light Illusion Geld zu "transferieren". Beim ersten mal (LightSpace) habe ich mangels Online-Berechtigung auch per Bankschalter meine Rechnung in EUR beglichen. Trotz bekanntem Wechselkurs (01/2013 1€ = £0,81176) kamen bei LI £43 zu wenig an, weil irgendwer in England auch noch die Hand aufgehalten hat. Musste ich nachüberweisen. OK, man ist ja lernfähig. Für die 2. Bestellung (größerer Betrag für einen Sensor) wurde im Überweisungsformular also gleich GBP angegeben. Meine Bank half mir alle Gebühren zu ermitteln, sodass der Rechnungsbetrag vollständig am Zielkonto hätte ankommen müssen. Tja ... hätte wahrscheinlich auch funktioniert, wenn die Auslandsabteilung meiner Bank aus "£" nicht versehentlich "$" gemacht hätte ...  ... kam also wieder zu wenig Kohle bei LI an ... ... kam also wieder zu wenig Kohle bei LI an ...  Ok, meine Bank hat das dann perfekt im Alleingang geregelt und letztendlich bekam ich sogar einen Teil der Gebühren + 2 Kinogutscheine geschenkt. Und Steve Shaw war ebenfalls nie sauer. Bin mal gespannt, ob unser tolles "SEPA"  Online-Banking nun bald auch mal GBP ermöglicht ... wobei die Sache mit England (Gebühren) schon einen Gang zum Schalter wert ist. Online-Banking nun bald auch mal GBP ermöglicht ... wobei die Sache mit England (Gebühren) schon einen Gang zum Schalter wert ist. |
||||||
|
*Harry*
Inventar |
#19
erstellt: 19. Feb 2014, 18:47

|
|||||
|
Zurück zu LightSpace. Es gibt von einem netten ex-Germanen namens Mike nun eine Webseite mit online-Tools, schwerlastig für LightSpace:  http://displaycalibrationtools.com/ http://displaycalibrationtools.com/Das ganze ist sehr übersichtlich aufgebaut und alle Tools haben eine - wie ich finde - leicht verständliche Beschreibung. Freeware:
Premium Tools (gebührenpflichtige Registrierung erforderlich):
Die Seite ist noch recht jung und könnte evt. noch Anpassungen bekommen. Ich habe bereits mit dem Custom Color Patch Sequence Generator (kurz. CCPSG) gearbeitet, und finde alleine das Tool schon sehr genial. So kann z.B. mit der Option "Generated Grid Sequence" durch Verschiebung der "Gewichtung" ein - sagen wir - linearer Abtastverlauf so verändert werden, dass bei Erreichen der halben Patchanzahl die RGB-Triplets im 8-Bit Datenformat noch unterhalb dez. 128 liegen (also dunkler sind) bzw. bei Nutzung der Invertierung die RGB-Triplets der Patche hier schon über dez. 128 liegen (und somit heller werden verglichen mit einem linearen Verlauf). Die Charakteristik der gesamten Profilierung kann also mehr in dunklere/hellere Bereiche verschoben werden. Auch möglich ist die Eingabe eigener Grid-Sequenzen per Option "Manual Grid Sequence". Hier bestimmt man die Anzahl + Aufteilung des Rasters, an dessen Stellen ein Patch erzeugt werden soll, selbst. Die Anzahl der Abstufungen ist dann die Basis zum Exponent ^3, wodurch sich die gesamt-Patchanzahl ergibt. Ein Beispiel für 8-Bit Patche: Wir wollen Patche im xyz-Raster 0, 10, 25, 50, 80, 110, 150, 190. 220, 255. Dies sind 10 Positionen 1-dimensional gesehen, was im 3D-Raum dann = 10^3 = 1000 Patche werden. Ein weiteres CCPSG Feature: Die Anzahl der Gamma-Abtastungsschritte (Grautreppe) kann höher gelegt werden als die in LS fest eingestellten 21-Schritte, u.v.m. Alle Daten werden online eingegeben + berechnet. Das Resultat (z.B. ein .csv File mit der neuen Patchsequenz) bekommt man dann per Mausklick sofort als Download verfügbar. Also wer interesse hat - einfach mal reinsehen. Ich denke, für jeden der sich tiefer mit Display-Profilierung und speziell LightSpace beschäftigt, ist das eine super Sache!  [Beitrag von *Harry* am 19. Feb 2014, 18:54 bearbeitet] |
||||||
|
mike_n
Ist häufiger hier |
#20
erstellt: 20. Feb 2014, 05:40

|
|||||
|
Harry, herzlichen dank fuer den umfangreichen Ueberblick - sehr informativ ! Ich habe ein paar Ergaenzungen - ich bitte vorab meine schlechte Grammatik zu entschudigen:    > Custom Color Patch Sequence Generator (CCPSG) Mit dem tool koennt ihr kontrollieren welche Patch Sequence ihr fuer das Profiling in Lightspace verwendet. Wie ihr ja wisst, Lightspace verwendet intern (by default) grid sequences fuer full Display Characterizations, zB. 10^3, 12^3, 17^3 etc. diese grid sequences haben sehr viele Punkte aber sind natuerlich nicht optimiert fuer die Beduerfnisse eures displays (Monitor, TV, Projektor etc). Mit dem CCPSG tool koennt ihr eigene grid sequences erzeugen und die u.a. fuer Plasma Profilierung optimieren. Ihr koennt auch Punkte entfernen die eurer probe/meter nicht lesen kann oder Probleme hat zu lesen. Lightspace hat vor knapp 2 monaten den import von eigenen patch sets ermoeglicht (wir haben lange gewartet) und nun habt ihr absoluten Freiraum, mit welchen patch sequences ihr euer display profiliert. logik ist: besseres profil > bessere daten fuer die LS color engine > bessere LUT > bessere kalibrierung > Color Patch Sequence Viewer (CPSV) Dieses tool zeigt die gleichen statistiken wie das CCPSG tool, mit dem unterschied das hier koennt ihr patch sets von eurerer festplatte laden und anzeigen lassen - das CCPSG tool zeigt nur statistiken an von patch sets die ihr gerade kreiert habt bevor ihr sie speichert auf eurem computer. Also wenn euch kollegen ein patch set schicken oder ihr eins aus dem internet herunterladet dann koennt ihr mit dem CPSV euch diese patch sets anzeigen lassen, bevor ihr zeit investiert damit eure displays zu profilieren. So wisst ihr was ihr verwendet. > Lightspace Profile Reporter (LSPR) Wenn ihr LS verwendet braucht ihr das. Volle delta E statistiken ueber jeden einzelnen punkt in dem LS profile. Viel mehr daten als Calman (Calman hat dafuer additional CIE graphs), und ihr koennt LS als validation tool verwenden was bedeuted dass ihr die probe genauigkeit und transparenz (--> probe accuracy and transparency) und speed von LS bekommt. Lightspace vervwendet und zeigt immer die exakten, genauen daten die der probe / meter liest an, da werden keine daten "aufpoliert". Die wenigen graphs die LS derzeit intern hat sind nicht genug, und der delta E graph in LS ist derzeit nur Graupunkte (--> greyscale). Mit diesem tool bekommt ihr einen vollen, detaillierten Bericht. - Mike |
||||||
|
Noodles73
Stammgast |
#21
erstellt: 20. Feb 2014, 18:32

|
|||||
Die Seite habe ich mir auch schon angeschaut und finde die Tools sehr interessant. Aber Deine Aussage macht mich jetzt etwas stutzig. Es sind also reine Online-Tools und keine Programme die ich lokal auf meinem PC installieren kann? Verstehe ich das richtig? |
||||||
|
Nudgiator
Inventar |
#22
erstellt: 20. Feb 2014, 19:17

|
|||||
Korrekt. Es handelt sich dabei um "Online-Tools". |
||||||
|
mike_n
Ist häufiger hier |
#23
erstellt: 21. Feb 2014, 04:36

|
|||||
|
Hi Noodles73, ja, du brauchst keine extra software zu installieren. Dein web browser ist ja schon installiert und die tools werden im web browser verwendet. Wichtig ist, dass um die seite zu verwenden muss man einen modernen, up-to-date web browser verwenden (Firefox, Chrome, IE 11 etc). Also, uralte IE versionen und co funktionieren nicht weil die nicht benoetigte Funktionalitaet haben. - Mike |
||||||
|
Noodles73
Stammgast |
#24
erstellt: 21. Feb 2014, 11:16

|
|||||
Hallo Mike, genau das ist der Punkt. Als Käufer würde ich es begrüßen die Software lokal installieren zu können. Damit habe ich Gewißheit die Programme jeder Zeit nutzen zu können und bin nicht davon abhängig ob die Seite erreichbar ist oder der Betreiber den Dienst nach kurzer Zeit wieder einstellt. Im LS Forum schreibst Du das die "Donation" ein zeitlich begrenztes Angbot ist. Wie lange ich dieses noch gültig? Auch ist nichts darüber zu finden wie lange ich die Dienste nach Zahlung nutzen kann, 1 Monat, 1 Jahr, zeitlich unbegrenzt? Wird es zukünftig weitere Tools geben, auf was können wir uns noch freuen? Auf Deiner Seite ist keine Datenschutzrichtlinie oder Ähnliches zu finden, was ich heutzutage schon als wichtig erachte. Was geschieht mit meinen Daten bei Dir? |
||||||
|
mike_n
Ist häufiger hier |
#25
erstellt: 21. Feb 2014, 12:03

|
|||||
Hi noodles73 (dein name erinnert mich an De Niro's character in Leone's "Once Upon A Time In America") sorry, die seite ist gerade erst public accessible gemacht wurden, weil ich ein paar calibration buddies hier und woanders zugang geben wollte - da werden noch einige infos in den FAQ hinzugefuegt... ;-) deine daten werden natuerlich nicht woanders verwendet, die registrierung beinhaltet nur email vor und nachnahme. donation ist ueber Paypal, also kriegen die deine (zahlungs) daten, nicht wir. was im LS forum erwaehnt wurde ist dass der derzeitige preis eine promotion ist, der preis sobald ein paar tools erweitert werden ist hoeher (kann ich jetzt noch nicht genau sagen)... die dritte sektion im CPSG wird derzeit fertig gestellt, die CUSTOM PATCH SET sektion - da kannst du frei nach wunsch jedes erdenkliches patch set kreieren, du bist nicht an grid sequences gebunden. Das wird die zukunft sein, fuer full profiles 3,000-5,000 punkte und vor allen dingen quick profiles / validation / verification profiles (100 - 1,000 punkte) weil die derzeitigen QP's in LS ja 141 punkte sind aber alles 100% saturation & 100% brightness... man muss die unteren sat / brt werte auch validaten.... weil beim Tatort (sorry, mir faellt gerade keine andere deutsche sending ein !!! hahaha) ja nicht nur 100%sat & 100% brt im bildsignal ist. mit dem tool kannst du alles nach belieben customizen und jede erdenkliche hue, saturation oder brightness kombination erstellen - die wird dir wieder vorher grafisch dargestellt damit du sehen kannst wie das patch set verteilt ist und welche bereiche du profilierst ! ne weitere erweiterung die ich schon mal erwaehnen kann ist das der LSPR die moeglichkeit haben wird mehrere LS profiles direkt gegeneinander zu vergleichen. also kannst du checken welche LUT besser performed oder ob du (1 monat spaeter) dein display ueberhaupt neu kalibrieren musst wenn's es nur einen tick gedriftet ist... das ist wirklich cool. ach ja... und der LSPR wird CIE graphs kriegen... ;-))) die ETA ist derzeit ungewiss weil vor allen dingen die LSPR erweiterung viel extra arbeit ist - dewegen derzeit die "promotion" - wer frueh supported kriegt nen discount.... alle premium user werden natuerlich zugang zu allen premium tools auf lebenszeit haben - mit dem zusatz dass sollten neue premium tools kommen die noch nicht existierten als du premium nutzer geworden bist und diese neue tools sind major releases, dass die dann eine weitere (kleine) donation benoetigen. Bitte nagel mich nicht darauf fest, das ist alles in der zukunft, und wird vielleicht nie so passieren. aber sobald Light Illusion die naechste major update released musst du ja auch neu bezahlen. genauso wie jedes zweite jahr bei Calman, Chromapure etc.... wenn wir nen brandneues tool fuer die neue LS version releasen (was einige monate development zeit gekostet hat) koennte das eine extra donation von ALS BEISPIEL US$15.00 kosten. du kannst dann entscheiden ob du das tool haben willst oder nicht, vielleicht upradest du ja gar nicht zu neuen LS version also waere das tool fuer dich irrelevant. Es werden auch noch 3-4 weitere Free Tools kommen, aber erst wenn die derzeitigen Premium tools komplett enhanced wurden. Bzgl, software distribution, ich verstehe deinen punkt absolut, aber das ist nun mal das model bei dieser software. Beides hat vor und nachteile. Glaub mir, alle post production facilities hier in LA sind froh nicht weitere software installieren zu muessen (workstations muessen clean bleiben)... updates zu der seite sind auch automatisch global fuer alle user. du bist technisch gesehen kein "kaeufer", du donatest geld fuer die seite - wenn deine donation hoch genug ist bekommst du eine premium membership die dir zugang zu den premium tools gibt... wir haben als beispiel donations erhalten die nur einige dollar waren und das war von LS HCL users die den frei zugaenglichen LSCMPE verwenden (und meter profiles damit erstellen) und sich bedanken wollten.... noch ein zusatz: es wird wahrscheinlich eine donation option geben nur zugang zu dem CPSG / CPSV fuer eine niedrigere donation zu bekommen... US$29.00 oder so (noch nicht genau klar was der preis ist) - Mike P.S.: sorry, mein deutsch ist schlecht und ich weiss... gross/kleinschreibung falsch ! [Beitrag von mike_n am 21. Feb 2014, 12:23 bearbeitet] |
||||||
|
*Harry*
Inventar |
#26
erstellt: 21. Feb 2014, 12:32

|
|||||
|
Nö Mike, Dein Deutsch ist prima verständlich! Seit der Rechtschreibreform haben wir eh' Kraut und Rübe ... ob groß oder klein ist mittlerweile nicht mehr sooo wichtig (nur wir älteren Semester "nativ"-Deutscher haben das noch "im Blut" ... ) "Passt scho!"    Besten Dank an Dich, dass Du Dir überhaupt die Zeit nimmst, hier zu posten.  |
||||||
|
Noodles73
Stammgast |
#27
erstellt: 21. Feb 2014, 12:58

|
|||||
|
vielen Dank für die ausführliche Antwort, Mike!! kann man mit dem CCPSG auch bestehende Sets neu arrangieren? Als Beispiel, ich möchte einfach nur das neue bcc11 patch set nach dark/light umordnen wegen dem ABL bei Plasma und ein mehr greyscale patches hinzu fügen. und wie Harry sagt, Dein Deutsch ist sehr gut. Da gibt es ganz andere Kandidaten hier im Forum  PS: Du hast einen Kunden mehr  [Beitrag von Noodles73 am 21. Feb 2014, 14:06 bearbeitet] |
||||||
|
mike_n
Ist häufiger hier |
#28
erstellt: 21. Feb 2014, 13:12

|
|||||
|
ich bin selber gespannt obwohl ich sagen muss dass die derzeitige color engine von LS schon sehr, sehr gut ist - ich vermute der grossteil wird interface udpates sein, aber wir werden sehen.... die option existierende sets zu editen gibt es derzeit nicht, das war urpruenglich mal ne idee, aber keiner hatte bis dato patch sets herausgebracht oder den import unterstuetzt... argyll hatte welche (aber die jungs machen einige "kompromisse" in den sets) und Light Illusion hat erst gestern welche herausgebracht. ich muss die mal validaten. wenn die Custom Patch Set sektion fertig ist, und user dann immer noch die option wollen - ergo es gibt patch sequences die sie nicht direkt mit dem Custom Patch Set editor kreieren koennen oder wollen, dann koennen wir das def dazu fuegen ! - Mike [Beitrag von mike_n am 21. Feb 2014, 14:20 bearbeitet] |
||||||
|
Noodles73
Stammgast |
#29
erstellt: 21. Feb 2014, 13:24

|
|||||
|
da Light Illusion ja noch mehr Optimised Patch Sequences herausbringen will, könnte die Edit Funktion durchaus Sinn machen. Als Plasma User weiss ich die stark reduzierte Anzahl an Patches sehr zu schätzen. (Du hast doch auch einen Plasma) Anders herum würde es auch gehen Wenn man mit dem CCPSG die gleichen Optimised Patch Sequences, wie sie Light Illusion anbietet, erstellen kann würde das die gleiche Funktion erfüllen. Oder bleibt das erstellen der Optimised Patch Sequences Light Illusion vorbehalten? PS: Wo kommst Du eigentlich ursprünglich her (Geburtsort) ? [Beitrag von Noodles73 am 21. Feb 2014, 13:28 bearbeitet] |
||||||
|
mike_n
Ist häufiger hier |
#30
erstellt: 21. Feb 2014, 13:40

|
|||||
"jeder" kann patch sequences erstellen. die frage ist nur was in den patch sequences "drin ist" (coverage und distribution), deswegen is der CPSV so wichtig und ich muss mal die neuen LI sets in den CPSV laden und anschauen... wie die genau "optimized" sind ist immer so ne fragem es gibt so viele variablen... der CPSG kann nur erstellen was die logik (der interface optionen) und funtionalitaet erlaubt, als bspl. derzeit gehen nur grid sequences, die in sich vor-und nachteile haben... die Custom Patch Set section wird extem viel freiheit geben... hab grad beschlossen, wir werden den CPSE (Color Patch Sequence Editor) bauen - relativ bald ;-) - Mike PS: urpsruenglich Bodensee PPS: und noch was, allgemein: der CPSG | CPSV | CPSE visualizen die sets in H|S|B was fuer menschen sehr leicht verstaendlich ist und deshlab sehr informativ ist, aber das ist nur ein weg sich color daten anzuschauen... cube view is another way, aber im cube ist es manchmal schwer zu sehen wo die sat/brt loecher sind - und in HSB siehst du nicht wie der cube sich verzerrt... alles immer ein kompromiss |
||||||
|
Noodles73
Stammgast |
#31
erstellt: 21. Feb 2014, 13:44

|
|||||
great news   |
||||||
|
*Harry*
Inventar |
#32
erstellt: 21. Feb 2014, 13:52

|
|||||
|
ahem ... was ist ein "bcc11" patch set? |
||||||
|
Noodles73
Stammgast |
#33
erstellt: 21. Feb 2014, 14:00

|
|||||
|
mike_n
Ist häufiger hier |
#34
erstellt: 21. Feb 2014, 14:02

|
|||||
also soweit ich weiss - und die terminology fuer bcc muesste ich jetzt tippen (hab ich vergessen) - aber bcc7, bcc11, bcc17 etc sind patch sets mit 7, 11 oder 17 grid points, d.h. 7, 11 oder 17 unique 1D patch points - Harry, genau das gleiche wie in dem CPSG 1D Grid sequence graph...also 7, 11 oder 17 unique RGB points... aus denen wird dann ein 3D set erstellt in einer speziellen logik und reihenfolge, bei den neuen sets von LI haben die praktisch 17^3 grid sequences genommen und punkte entfernt die aehnlich sind um das set zu verkleinern, weil die color engine wahrscheinlich auch ohne diese zusaetzlichen daten sehr gute ergebnisse erzielen kann... [Beitrag von mike_n am 21. Feb 2014, 14:03 bearbeitet] |
||||||
|
*Harry*
Inventar |
#35
erstellt: 21. Feb 2014, 14:12

|
|||||
|
aha ... ich bin seit dem Thema in anderer Runde  schon ständig am Überlegen, was bcc ausgesprochen bedeuten könnte ... schon ständig am Überlegen, was bcc ausgesprochen bedeuten könnte ...(habe noch keines der Patch sets bcc11 ... bcc17 verwendet) Etwas verwirrend ist es schon:
Dachte bislang, bcc17 = für DC "17-side" [Beitrag von *Harry* am 21. Feb 2014, 14:13 bearbeitet] |
||||||
|
mike_n
Ist häufiger hier |
#36
erstellt: 21. Feb 2014, 14:14

|
|||||
|
ja die terminology ist verwirrend, ich hab bcc files hier von Argyll (von letztem jahr) und die logik war so wie beschrieben... wie gesagt, ich wuerde erstmal im CPSV auschecken bevor ich zeit investiere.... ;-) |
||||||
|
mike_n
Ist häufiger hier |
#37
erstellt: 07. Mrz 2014, 13:07

|
|||||
|
Hi,  DisplayCalibrationTools.com hat ein neues tool und ein paar updates erhalten. DisplayCalibrationTools.com hat ein neues tool und ein paar updates erhalten.1) Neues Tool Das neue tool ist die Custom Patch Set section in dem  Custom Color Patch Sequence Generator. Custom Color Patch Sequence Generator.In diesem tool koennt ihr jede erdenkliche color patch sequence erstellen via HSB controls, inclusive Greyscale. Ihr koennt auch nur Greyscale machen fall ihr wollt, bis zu 101 punkten. In dieser sektion gibt es auch predefined patch sets, die sehr nuetzlich fuer validation sind: Color Checker Classic Color Checker SG SG Flesh Tones ECDIS Day ECDIS Dusk ECDIS Night Luschan Skin Tones falls ihr dieses tool verwendet, bitte schaut in die "Notes & Instructions", wie ihr sehen werdet, ihr koennt einiges mit dem tool machen... 2) Updates Der  Lightspace Profile Reporter und der Lightspace Profile Reporter und der  Lightspace Custom Color Space Creator]http://displaycalibr... Color Space Creator haben updates erhalten, die es euch ermoeglich euer Gamma zu verbessern. Lightspace Custom Color Space Creator]http://displaycalibr... Color Space Creator haben updates erhalten, die es euch ermoeglich euer Gamma zu verbessern.In dem LS Profile Reporter, unter dem 2. Gamma graph, ist jetzt ein link mit dem titel "Copy Gamma Compensation Offsets For Custom Color Space Creator". Wenn ihr diesen link clickt, dann werden Gamma offsets erstellt fuer alle Gamma punkte im dem LS profile, bspl 21 punkte, und diese offsets werden gespeichert. Ein Gamma offset ist die differenz zwischen dem tatsaechlichen Gamma und dem Gamma target, bspl 2.2. Wenn ihr nun in den Lightspace Custom Color Space Creator geht, und einen custom color space erstellt mit denselben Gamut und denselben Gamma erstellt wie nach dem ihr im LS Profile Reporter validated habt, bspl. im LSPR habt ihr das LS profile mit Rec 709 G 2.2 geprueft und dann unter dem 2. Gamma graph den link geclickt, dann muesst ihr im CCSC nun auch einen custom color space mit Rec 709 Gamut und Gamma 2.2 erstellen... wenn ihr das macht, erscheint ein button mit dem titel "Paste Gamma Compensation Data from Profile"... wenn ihr den clickt werden alle Gamma adjustment points automatisch erstellt... ihr braucht jetzt nur noch den graph updaten und dann den custom color space speichern... In meinem naechsten post zeige ich bilder mit einem beispiel - hoert sich hier kompliziert an, ist kinderleicht.... den custom color space verwendet ihr dann in LS als SOURCE in dem Convert Color Space tool... super easy, super schnell und hilft sehr mit Gamma, especially for Plasma... Lasst mich wissen falls ihr Fragen habt... - M [Beitrag von mike_n am 07. Mrz 2014, 14:03 bearbeitet] |
||||||
|
mike_n
Ist häufiger hier |
#38
erstellt: 07. Mrz 2014, 14:03

|
|||||
|
Okay, hier ist ein calibration workflow fuer Lighstpace mit den tools von DisplayCalibrationTools das custom color patch sets verwendet und das Gamma verbessert... der post ist in Englisch, ich will euch das nicht antun dass ich das versuche ins Deutsche zu uebersetzen. Euer Englisch ist besser als mein Deutsch... ;-))) noch ein hinweis: ich kenne nicht alle optionen dieses forums, aber wenn die bilder zu klein erscheinen dann koennt ihr auf die bilder clicken um in die gallerie zu kommen und dann gibt es auf der rechten seite mehrere optionen... eine option ist VOLLBILD ANZEIGEN, eine andere option ist BILD HERUNTERLADEN... dann koennt ihr wirklich sehen was auf den bildern angezeigt wird. TV set is a Panasonic 65VT60 NA (North America) Latest Lightspace. Meter is a K10-A with spectro offset. Lumagen pattern generator VT60 PRE-PROFILE DISPLAY SETUP Turned all internal processing off. Used Ted's disc to check which CMS controls introduce problems. Dial in Brightness via LI's brightness calibration image - those patches are 1 lsb each. We also used Ted's disc to confirm the Lumagen (used as a pattern generator) was outputting correct levels. You would now setup Contrast the usual way, but for the VT60 I will go into into detail here as these sets have Gamma issues - I have confirmed this with multiple other VT60 owners - if you don't own a VT60 you may consider skipping this section: The VT60 has very inconsistent Gamma, especially in the 85-100% brightness region, which can result in very wild gamma spikes (seen on a Gamma log-log graph) that can go either direction, towards a higher or lower Gamma value. I've seen as low as 0.97 and as high as 3.6 - sometimes (depending on Gamma and contrast setting) the display shows a double spike, it goes down to 1.0 and then up to 3.0 all within the last 6% brt, ergo 94-100%. It does not matter which settings are used: Pro mode or custom, ISF Night or Day, I’ve set Contrast to everything between 50 and 100, I’ve tried all color temperatures and all Gamma pre-sets and a combination of them. Standard 10pt or even 21pt Greyscale runs don't really show the issue as the 5% brightness spacing is too large. You might see problems at 90 and/or 95% but then again the internal VT60 gamma controls are 10pt only anyways, so way too coarse to fix or address these issues. You need a GS evaluation with 101 pts, ergo very tight spacing of 1% to really see what is going on. Here are 3 gamma graphs of 3 different VT60's (all NA) - all profiles are 101 pt GS runs, so u see what is really going on: 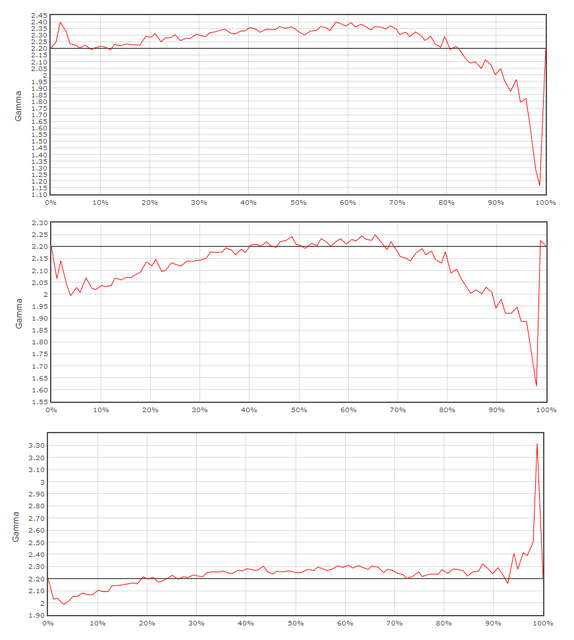 We're using the  Lightspace Profile Reporter to directly evaluate LS profiles - in the case of the 3 gamma graphs: 101 pt Greyscale only profiles. This workflow allows me to stay in LS and use all of the professional tools that LS offers that other solutions do not offer (active LUT etc, see later in the workflow) w/o having to switch to another solution to get a profile evaluation (and then deal with other issues). This speeds things up quite a bit. Lightspace Profile Reporter to directly evaluate LS profiles - in the case of the 3 gamma graphs: 101 pt Greyscale only profiles. This workflow allows me to stay in LS and use all of the professional tools that LS offers that other solutions do not offer (active LUT etc, see later in the workflow) w/o having to switch to another solution to get a profile evaluation (and then deal with other issues). This speeds things up quite a bit.Contrast setup: I ran a 101pt greyscale only in Lightspace (using a custom color patch set that only contains 101pt Greyscale), then checked for drastic Gamma spikes, then adjusted Gamma / Contrast setting and or used Gamma CMS control. Did this a few times, trying to bring the drastic spikes somewhat under control. I will address / improve Gamma later on in the workflow, but the better the pre-profile setup the easier the adjustments will be later on. CREATE COLOR PATCH SEQUENCE FOR PROFILING All color patch sequences (profiling & validation) were created using the  Custom Color Patch Sequence Generator Custom Color Patch Sequence GeneratorThe profiling patch set that was used in this calibration is a larger color patch sequence. Before Lightspace allowed the import of custom color patch sequences we've been using 21^3 patch sequences with 9,261 points. With a fast meter the time frame is easily doable. This patch set was targeted to have equal or less points than a 21^3 but with improved performance, as in that it "scans" / profiles the gamut more evenly and more throrough, providing more relevant and conclusive information to the color engine. This set has 9,137 points (so slightly less than a 21^3) but with better profile point coverage and distribution than a standard grid sequence including a 101 point Greyscale (and all corresponding R, G, B reads). This is a very straightforward patch set that I used for this calibration, easy to understand, you can easily decrease the point count (profile size) if you like. For other calibrations, I used a an more refined variation of it. Regarding patch set size: if you cut the point count too much your results be inferior. The more accurate and conclusive data you provide to the color engine, the better the results will be. The patch set was created with HSB parameters, easily understandable and very easy to control. Here are the patch set parameters: 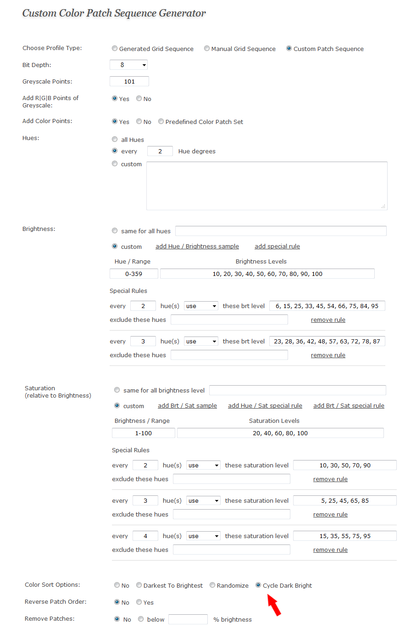 Explanation: As you can see - in this specific patch set - I am sampling every 2nd integer hue value, so out of 360 hues, we are sampling 180 hues. That is a tight spacing of just 2 hue degrees and will make sure we don't leave out too many hues. For Brightness levels, we are sampling a total of 30 (!) brightness level, a 21^3 (with more profile points) samples just 21 brt levels. As you can see the brightness levels are grouped in packs of 10 brt levels and changed for each hue, this way we keep the the total point count lower BUT we are sampling 30 brt levels in just 4 hue dgrees ! So over a very narrow span of just 4 hue degrees (!) our color engine will get LOTS of data of that parts of the gamut, example: 0 deg is sampled with these brt levels: 10, 20, 30, 40, 50, 60, 70, 80, 90, 100 2 deg is sampled with these brt levels: 6, 15, 25, 33, 45, 54, 66, 75, 84, 95 4 deg is sampled with these brt levels: 23, 28, 36, 42, 48, 57, 63, 72, 78, 87 --> brt cycle starts again at 6 deg using these parameters You can see how powerful this is, I can easily refine this patch set and even expand the brt level range without increasing the total profile point count ! So I could add another 10 unique brt levels for a total of 40 brt levels over a span of just 6 hue dregrees. Just keep in mind to find a balance between the hue span and the brt levels. Don't let the span get too wide with brt levels points that are "too far apart". Also, note how the 3 brt level groups are stacked / spread to each other, they sit within the other groups spacing. Saturation levels are relative to brightness, so each of these saturation levels are sampled for each or specific brightness levels. Again, because we want to get the most data from the gamut out of our patch set, we stack sat levels in groups. We are using 20 well spread sat levels in 4 groups. Similar to what we do with the brt levels we change the sat levels for the brightness levels with every other hue from our hue set. brt levels @ 0 deg are sampled with these sat levels: 20, 40, 60, 80, 100 brt levels @ 2 deg are sampled with these sat levels: 10, 30, 50, 70, 90 brt levels @ 4 deg are sampled with these sat levels: 5, 25, 45, 65, 85 brt levels @ 6 deg are sampled with these sat levels: 15, 35, 55, 75, 95 Again, note how the 4 sat level groups are stacked / spread to each other, they sit within the other groups spacing. So, summing up, over a narrow span of just 6 hue degrees we are sampling: 3 unique hues, 30 unique unique brt levels (with a total of 40 brt levels sampled) and 20 unique saturation levels - all nicely spaced to cover the region evenly. Here's a visual evaluation of the patch set  Take a note how evenly we distributed points, especially pushing enough data into the 25-75% brt and 25-75% sat range. DECREASING PATCH SET SIZE & FURTHER REFINEMENTS To further refine this set, one could start to adjust the hue spacing depending on region, e.g. sample with wider spacing in dense gamut regions (--> green, blue) and with more narrow hue spacing in less dense regions (--> red). Just don't let the spacing get too wide. The further add more brt & sat levels and distribute them smartly. Example of different hue sampling depending on hue region:  To decrease the patch set size, there are lots of options: For starters, one could decrease the brt levels and sat levels below 25% brt and above 80% brt, because the shadows and highlights contain less information. If your screen is inaccurate in the shadows (i.e. LCD backlight contamination) u don't need to waste your time there anyways. Same if your meter can't read low brt levels. Or simply increase the hue spacing, e.g. sample every 3rd or 4th hue. Or one could simply take out brt levels and sat levels in all brt levels. This will drastically reduce patch set size. Instead of 30 brt levels have 20 or 15, instead of 20 sat levels have 10 - OR - keep 30 brt and 20 sat levels but distribute them over a wider hue range... Lots of possibilities. Alright, enough talk run the profile on the VT60. ;-) Took ca. 3 hours with the K10 because we included a 0.75s extra delay to prevent temporary IR from the last color patch. Then created LUT in LS targeting the standard Rec 709 Gamma 2.2. LUT VALIDATION (1) Gamma Evaluation and Gamma Adjustment Now - first of all - run a patch set that only contains 101 pt Greyscale (nothing else) to spot possible Gamma problems of the LUT. Run the patch set with the LUT ACTIVE IN LS. There's no need to upload the LUT to the LUT box at this point (and waste time) as we might tweak the LUT. We do the Gamma eval FIRST, so we can compensate / address / fix possible Gamma issues in the LUT. Lightspace has these tools and we will use them. We will fully evaluate the gamut and the color performance later, no worries. Here's the Gamma that the Rec 709 G 2.2 LUT created for the VT60:  Gamma of 2.25 and the Gamma log-log graph shows Gamma problems, I want to improve that. Background: LS introduced parametric Gamma control in Jan 2014. This allows you to make Gamma adjustments using up to 101 points. Without points at 0 and 100 stimuli, that leaves 99 effective adjustment points. I guess now you realize why we ran a 101pt validation GS run. ;-) In order to make adjustments, you need to create a custom color space, which is a file containing gamut and gamma information that is then imported into LS and used as a SOURCE in the Convert Color Space section to create a LUT. How do we use this in this calibration ? Simple, we create a custom color space with the same gamut as Rec 709 - since we want Rec 709 gamut. Now, we start adding gamma adjustment points inside the color space file. Once you use this custom color space file to create a LUT, the Gamma of the LUT will be affected by your adjustments. I'm using  Custom Color Space Creator that does all of this for me. You can do this manually, use one of the LS preset color space files, open them and check out the file structure. Make sure you do not make any syntax errors otherwise this will have (unknown) consequences. I do not recommend to do this manually, it is quite complex, but possible. Custom Color Space Creator that does all of this for me. You can do this manually, use one of the LS preset color space files, open them and check out the file structure. Make sure you do not make any syntax errors otherwise this will have (unknown) consequences. I do not recommend to do this manually, it is quite complex, but possible.Since we ran 101 pt GS validation we have data of 99 effective Gamma points (between 0 and 100 stimuli) and we can use the data to create the maximum amount of Gamma adjustments in a custom color space. In my workflow, I simply check out the profile report of the 101 pt GS run - then simply click the button at the bottom (which creates Gamma adjustments) - then use another tool that creates the custom color space for me with the Gamma adjustment data. Here is an image where u can see all 99 Gamma adjustment points and the Gamma adjustments it creates: 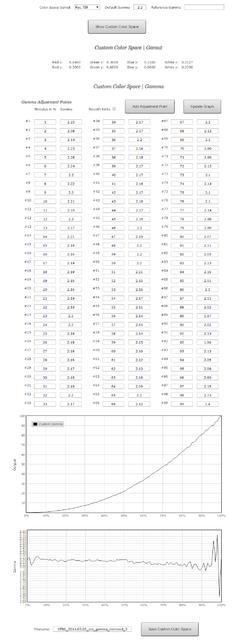 Save the file and use in LS as a source to create a new LUT, see here - in the SOURCE select menu choose your custom color space, in the DESTINATION select menu choose your profile: 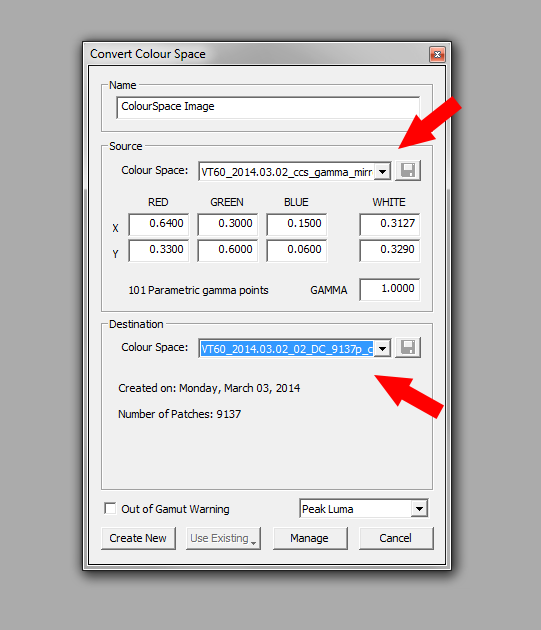 Same thing now as before, to speed up things, with the new LUT ACTIVE IN LS, run a 101 pt GS. Evaluate, if not happy, adjust a bit more, run another 101 pt GS profile and evaluate again. I did just 2 runs of this, took me 8 mins with this workflow. Here's the Gamma that the LUT (using my second custom color space) produced: 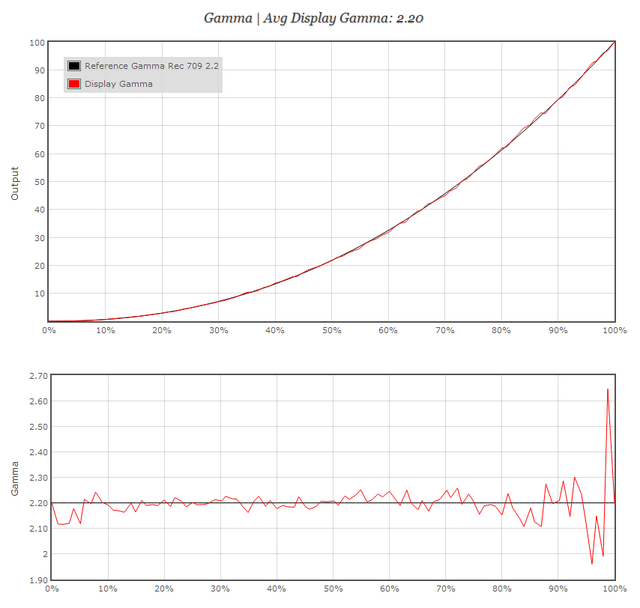 Much better. I could go on with tweaking, but I'll leave this for now as is. To control the crazy spikes of the VT60 at the very end is harder. Again this is a 101 pt Greyscale and it shows everything. A 21pt or even worse a 10pt would be much "smoother" but would not really show what is going on. Remember, the more Gamma adjustment points you add to your custom color space the more control you will have over the Gamma. Now, on to color evaluation. (2) Validation Patch Set I used a simple yet effective validation patch set that can easily be further refined. I wanted a patch set around 1,000 points, this has 1087 points. Patch set should contain points you profiled and points you did not profile so u can validate direct offset compensation points and interpolation points of the LUT. This patch set has 15 degree hue spacing, 10 brt levels and 8 sat levels (in groups of 4). Below 20% brt, the set samples only 3 sat levels. The hue interval has the effect that we sample hues that were not profiled, i.e. 15, 45, 75 deg etc., so we'll see how good the interpolation is in some parts. This hue interval also mean we are sampling all primaries and secondaries RGBCMY: 0, 60, 120, 180, 240, 300 and all points in between them and all points in between the in-between points. Since we originally profiled every second hue (basically every even hue number) that means that every other hue that is validated here is a hue that was originally profiled, so we can verify how good the LUT is at direct offset compensation. Again, cycle between dark / bright patches to (try to) counteract ABL on the VT60. 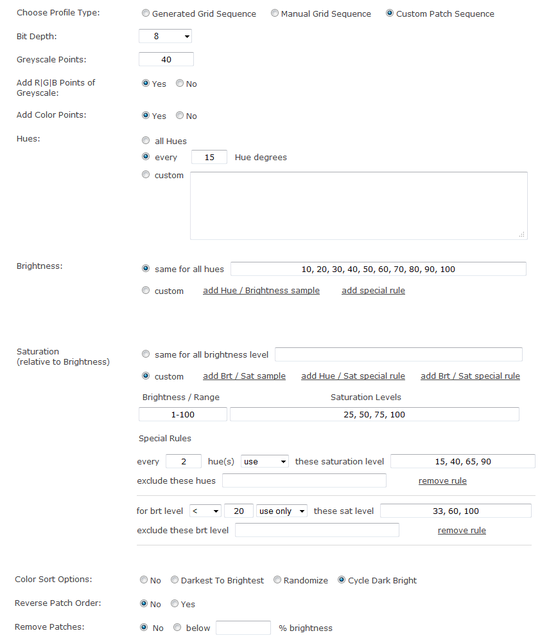 Here's parts of the evaluation report from the  Lightspace Profile Reporter, I collapsed all color detail data and omitted a few things from the report as otherwise this would have become too large of an image: Lightspace Profile Reporter, I collapsed all color detail data and omitted a few things from the report as otherwise this would have become too large of an image: 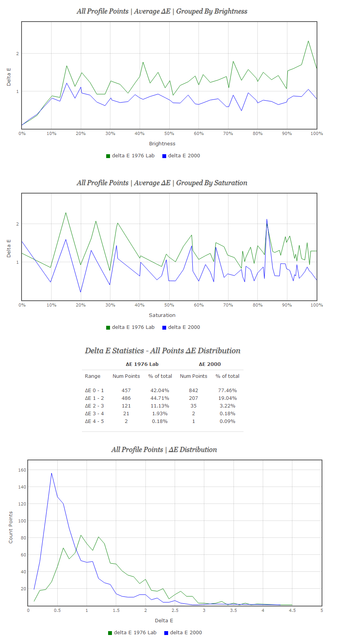 Here's validated with a standard 141 pt LS QP:  Skin Tone Eval Ran an additional quick skin tone eval: 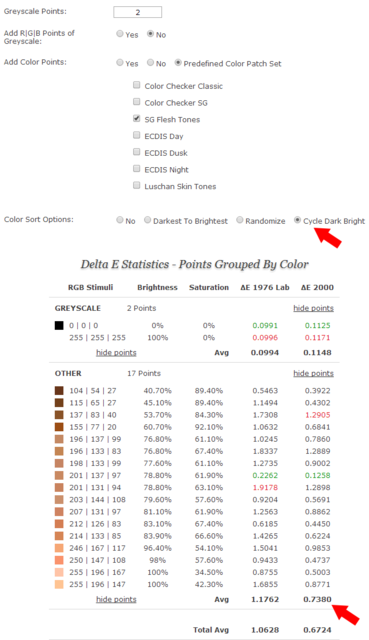 |
||||||
|
Noodles73
Stammgast |
#39
erstellt: 10. Mrz 2014, 12:19

|
|||||
|
Hi Mike, Thanks for the increadible workflow!! joined the premium member ship last weekend and played with Your tools. I experienced some strange things when I created the patch set from Your example, the results doesn't match for some reasons. - all hues are sampled even with 50 points, except 0°, 120° and 240°, they are sampled with 150points - the number of points of 100% saturation is 900 after loading the patch set into the viewer, that charts and statistics look totally different. Used Firefox v27.0.1 attached the images of the creator: 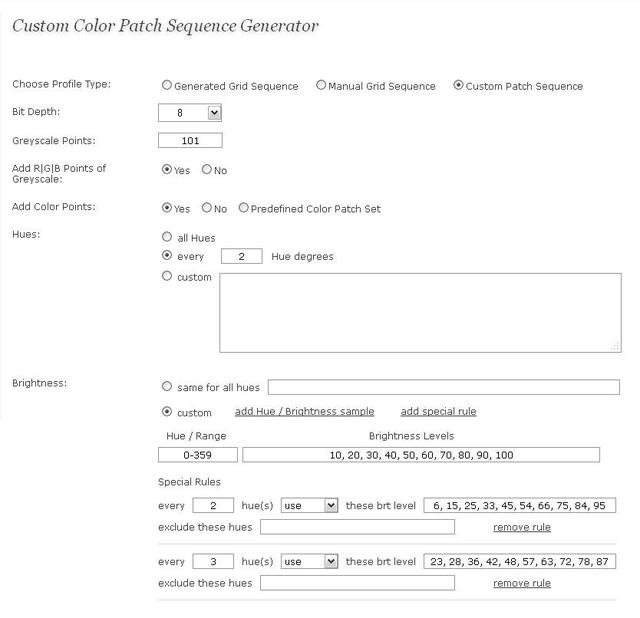 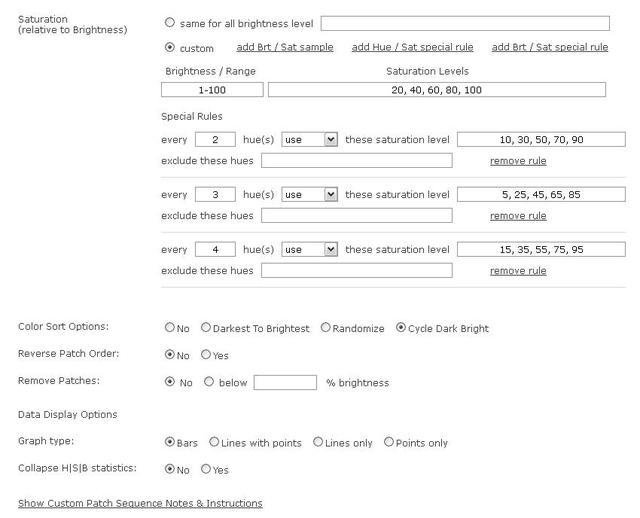 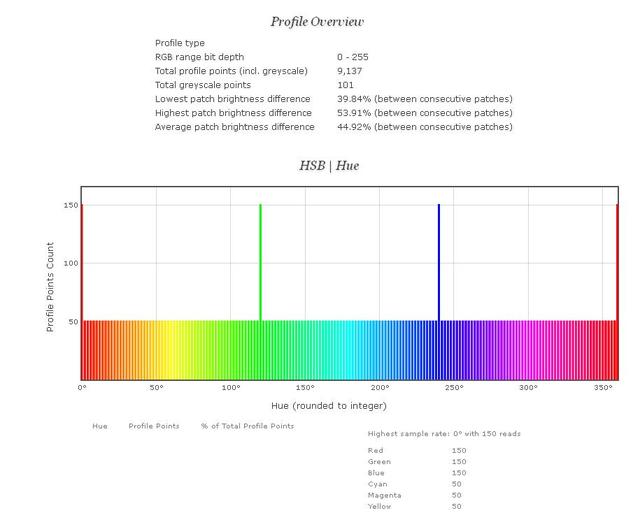 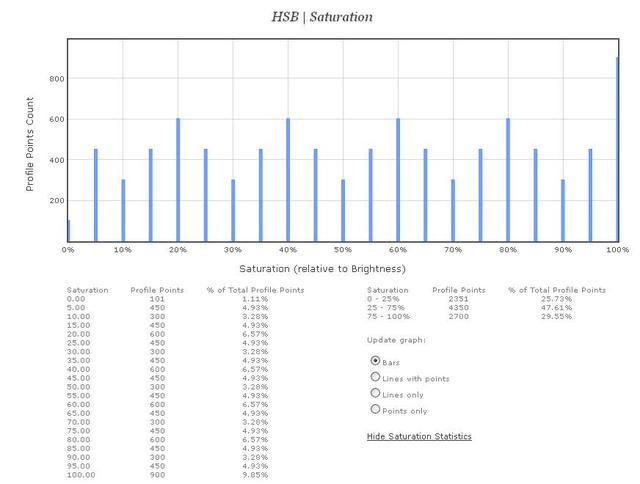 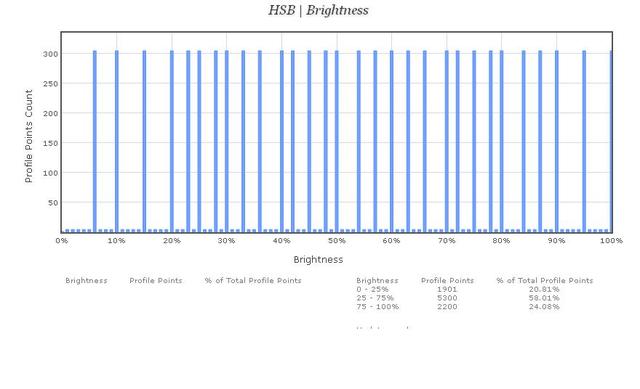 and the viewer:  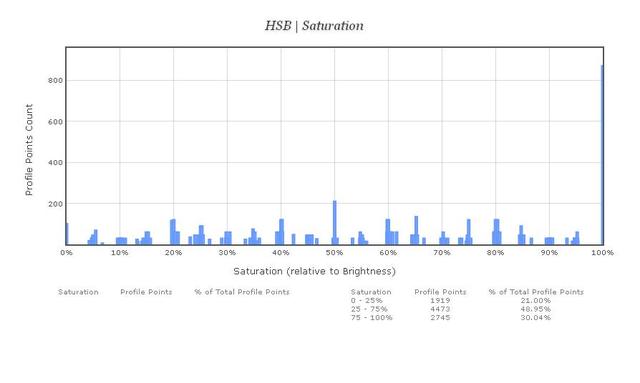 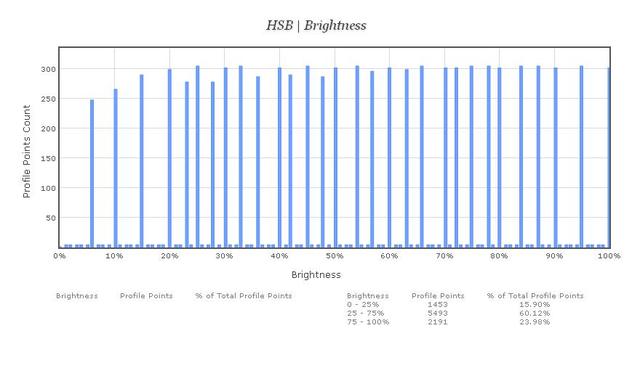 |
||||||
|
mike_n
Ist häufiger hier |
#40
erstellt: 10. Mrz 2014, 15:43

|
|||||
|
Hi Noodles, das ist vollkommen richtig so. die extra Red, Green, Blue reads sind wegen der Greyscale. wenn du 101 punkte GS nimmst dann werden 101 punkte von red, green und blue (by default) dazu gefuegt damit der RGB Separation graph in LS angezeigt werden kann. Ohne diese extra daten kann der RGB Separation graph nicht angezeigt werden. Wenn du darauf keinen wert legst, kannst du diese extra reads weglassen in dem du die option "Add R|G|B Points of Greyscale:" mit NO checkst.... - Mike |
||||||
|
mike_n
Ist häufiger hier |
#41
erstellt: 10. Mrz 2014, 15:55

|
|||||
|
der unterschied zwischen viewer und original custom patch set graph ist weil in der custom patch set sektion werden die H|S|B daten verwendet die du eingegeben hast, das ist absolut genau... wenn das patch set erstellt wird in RGB triplets, werden HSB zu RGB umgewandelt (mit rundung) und dann muss auf eine integer RGB zahl [0, 255] wieder gerundet werden.... dann werden diese daten im viewer wieder in HSB umgewandelt wieder mit rundungen... deswegen siehst du leichte unterschiede im Hue und Saturation graph - vor allen dingen im saturation graph - aber wenn du dir die gruppen 0-25, 25-50, 75-100 saturation anschaust dann siehts du dass die zahlen fast gleich sind... - M |
||||||
|
Master468
Inventar |
#42
erstellt: 10. Mrz 2014, 23:36

|
|||||
Vielleicht könntest du hier als Option noch eine Angleichung zwischen Charakterisierungs- und Referenzweißpunkt anbieten - also jeweils vollständige visuelle Adaption unterstellen. Das würde u.a. die Beurteilung der nativen Grauabalance erleichtern und die Farbabstände hinsichtlich der tatsächlichen Adaptionsprozesse des Auges einnorden. Gruß Denis [Beitrag von Master468 am 10. Mrz 2014, 23:41 bearbeitet] |
||||||
|
mike_n
Ist häufiger hier |
#43
erstellt: 10. Mrz 2014, 23:45

|
|||||
Dennis, kannst du das an einem Beispiel erlaeutern ? ich hab die msg mehrmals gelesen aber mein deutsch ist nicht mehr so... ;-))) meinst du einen color comparisor wie CM es hat ? tatsaechlicher grey patch vs. target grey patch ? - Mike [Beitrag von mike_n am 10. Mrz 2014, 23:45 bearbeitet] |
||||||
|
Nudgiator
Inventar |
#44
erstellt: 10. Mrz 2014, 23:50

|
|||||
Ich bin Deutscher, hab's aber auch nicht verstanden  Erleuchte uns, Denis  |
||||||
|
Master468
Inventar |
#45
erstellt: 11. Mrz 2014, 00:09

|
|||||
|
It would be a nice optional feature for the validator if it assumes complete visual adaption regarding the actual whitepoint (display whitepoint for the characterization data, reference white for the target). This can be achieved by adapting the characterization data relative to the display whitepoint to the reference whitepoint (compare to the procedures of the ICC workflow with D50 as common PCS reference white). For a seperate evaluation of the grey balance you can just calculate with the actual display white (will lead to a dE = 0 for white regardless of the reference). dw = display white rw = reference white XYZ (sample adapted to rw) = f(XYZ(sample), XYZ(dw), XYZ (rw)) You can use the Bradford cone response domain definition or let the user choose the transformation. But I think that I'm going into too much detail here. If there are any questions feel free to send me a message or mail :-). To point it out: I don't want to criticize your current solution. This additional feature would just enhance its expressiveness further - at least for nitpicker like me ;-). [Beitrag von Master468 am 11. Mrz 2014, 00:21 bearbeitet] |
||||||
|
mike_n
Ist häufiger hier |
#46
erstellt: 11. Mrz 2014, 00:23

|
|||||
|
Dennis, got it. Yes, all possible. Initially that was an option and is not too hard too implement, and I would let the user choose the transformation model from a list. But to be honest (from what I can see right now), almost no one will use this and / or understand the difference of the data that is then being presented. I get already many question asking which of the 4 dE formulas to use.... ;-) There is quite a difference between the starting novice, HT calibrator and then expert users like yourself. In any case, I'll put it on the list ! The LSPR will get some other additions first, the next one is going to be that one can compare 2 profiles, lot's of use cases for this, one being that it makes it easy to see how much your calibration differs from last characterization so u can choose whether you need to profile / calibrate again or not. - Mike |
||||||
|
mike_n
Ist häufiger hier |
#47
erstellt: 06. Apr 2014, 09:41

|
|||||
|
Hallo zusammen, neue updates, freie tools und calibration guides & workflows wurden heute auf  DisplayCalibrationTools released. Hier ist die Uebersicht auf English: DisplayCalibrationTools released. Hier ist die Uebersicht auf English:(1) Updates To Existing Tools The  Lightspace Profile Reporter has received the following updates: Lightspace Profile Reporter has received the following updates:•added Advanced Options interface •added option to display CIE data for every profile point: XYZ, Yxy, Yuv •added option to choose Reference White Point used in color conversions such as Display White Point, Color Target White Point, A, B, C, D50, D55, D65, D75, DCI P3, DCI XYZ, E, F2, F7, F11 •added option to choose the Chromatic Adaptation Method (CAT) such as Bradford, von Kries etc •added option to enable a delta E filter that allows you to filter profile points above or below a delta E threshold •added additional helper to copy / add relative gamma offsets to Lightspace Custom Color Space Creator The  Lightspace Custom Color Space Creator has received the following updates: Lightspace Custom Color Space Creator has received the following updates:•improved accuracy, stimuli values allow float values now •added Advanced Options for gamma adjustment points •added helper to paste / add relative gamma offsets (copied from Lightspace Profile Reporter) to existing gamma adjustment points (2) New Free Tools The free  Meter Profile Comparison tool allows you to compare an active meter profile against a reference meter profile. The comparison overview includes xyY, XYZ, Yuv stats as well as luminance difference and delta E results in dE 1976 Luv, dE 1976 Lab, dE 1994 and dE 2000. Meter Profile Comparison tool allows you to compare an active meter profile against a reference meter profile. The comparison overview includes xyY, XYZ, Yuv stats as well as luminance difference and delta E results in dE 1976 Luv, dE 1976 Lab, dE 1994 and dE 2000.The free  Meter Distance & Pattern Size Calculator tool allows you to calculate the pattern size of a rectangular patch on screen and then use the dimensions to calculate the maximum meter distance for colorimeter and spectrometer. Meter Distance & Pattern Size Calculator tool allows you to calculate the pattern size of a rectangular patch on screen and then use the dimensions to calculate the maximum meter distance for colorimeter and spectrometer.(3) New Display Calibration Guides & Workflows We have added a new section that contains Display Calibration Guides & Workflows. Two calibration guides were added: •  Eizo CG275W Calibration Guide Using Lightspace And ColorNavigator Eizo CG275W Calibration Guide Using Lightspace And ColorNavigator•  Panasonic 65VT60 3D LUT Calibration Using Lightspace & eeColor Panasonic 65VT60 3D LUT Calibration Using Lightspace & eeColor- Mike |
||||||
|
Master468
Inventar |
#48
erstellt: 06. Apr 2014, 12:20

|
|||||
Sorry, I haven't seen your reply. Thanks for considering it. Must admit that I don't even use LightSpace. My demands regarding home cinema reproduction are quite basic.
I wouldn't call it amateurish. Most calibration software for display calibration in the ICC environment don't allow for individual corrections through linear transformations or display characerizations - but rely on a generic approach (which also Color Navigator supports when choosing the "Color management" compensation table). The CG275W - respectively its successors - is well suited for its intended tasks. When taking adaptation processes of the eye, constraints of normative CMFs (strong observer metamersim for narrowband spectra) and the workflows beeing used in the graphic industry (which the screen is aimed at) into account the impact of pure absolute errors is quite small and obfuscated by other influences. At the same time most users only have access to prosumer spectrophotometers (with emissive mode) as reference that don't comply with established recommendations like ISO 3664 and 12646 - an additional element of uncertainty. A typical operational scenario for the CGs is digital image processing often combined with print matching under standard light conditions. The whitepoint is usually chosen individually to achieve a visual match regarding media white under softproof conditions. A moderate absolute error doesn't come into play here as long as the measurement itself is consistent - which is the case for modern colorimeters (pure filter error). However: The internal probe can be correlated with a reference measurement (the reference probe must be supported by Color Navigator).
As mentioned, the CGs are mostly designed for usage in color managed environments. So we always have an appropriate characterization for a CMM combined with a linearization during calibration. The color space emulation isn't used here. Apart from that it is of course a strong feature. When only using Color Navigator there are two utilization alternatives. One is based on a reference condition and calculated by the display engine. It is subject to age-related drifts (although you can update the reference data). But the supporting points can also be calculated by a CMM based on the actual characterisation data (Advanced => Emulation). Best regards Denis [Beitrag von Master468 am 06. Apr 2014, 14:23 bearbeitet] |
||||||
|
mike_n
Ist häufiger hier |
#49
erstellt: 06. Apr 2014, 12:41

|
|||||
|
Completely disagree. CN is a failure and useless in color critical application. The profiling process (besides that it profiles a TINY part of the gamut) is useless w/o ref offsets - everything else is fooling yourself, same as the limited reports. When validated properly the CN LUT is not great, especially not compared against the LS LUT - but that is partly b/c of the missing offset which makes colorimeter only readings inaccurate.... even when using the K10-A which costs twice as much as the screen itself ;-) I got way more info (than what was posted) as I was in daily contact w/ Eizo Japan for over 2.5 months... their engineers modeled reports after my reports, incl LCD backlight contamination. I can't post the sensitive data here, but if u want color accuracy out of these screens, especially for Rec 709 usage, I highly recommend to use the LS LUT - they came to the exact same conclusion after they looked at real reports. u know why CN doesn't allow meter offsets ? b/c apparently it is too much for them atm to calculate the offset to the active meter reading on the fly ;-))) and there is much more.... Naturally they admitted bad design on the 3D LUT merge feature as well as the (useless) preset modes... it's a first gen product and they improved some of the features in the next gen model... it is what it is. w/ a proper LS LUT the CG275W is def usable... we've been using it for grading on a few projects. but FSI is better (less backlight issues and less LUT distortion). - M P.S.: the internal meter is garbage - u will very quickly see that once u validate against a ref meter. |
||||||
|
mike_n
Ist häufiger hier |
#50
erstellt: 06. Apr 2014, 12:45

|
|||||
|
btw, CN is not ICC based calibration... it places an ICC file in the Windows folder but that is used to correlate the internal LUT... CN does do a 3D LUT cal that it stores inside the Eizo's internal memory bank. - Mike |
||||||
|
Master468
Inventar |
#51
erstellt: 06. Apr 2014, 12:51

|
|||||
We are free humans. So nothing to say against that.
I have pointed out the area of application those screens are aimed at and speaking from a user as well as developer perspective. But I think that the kind of sharpness the discussion is already getting won't lead to a fertile exchange of views and ends in competence assertions. Quite a pity from my point of view.
Not neccessary (see above).
Please no hairsplitting: Of course there is no vcgt - the linearization takes place in the display LUT. But the display is charaterized by the profile so that a CMM can transform from and to the PCS.
No. The current state is colorimetrically charaterized by the profile. The CMM of color aware software will build up a gbd on its basis (colorimetric RI). We must clearly separate between workflows with (for example image processing) and without (for example video color grading) ICC based color management. To point it out clear: For usage in color aware software you will calibrate with native color space to maximize flexibility. For other tasks with known content you will use the color space emulation which can be accessed in two different ways (as described).
I don't like the diction - such attributes don't lead to a discussion culture necessary to bring things forward. However: I have tried to comment on the impact of absolute errors with respect to perception, colorimetric constraints and the actual color matching conditions in the graphic industry. Best regards Denis [Beitrag von Master468 am 06. Apr 2014, 13:24 bearbeitet] |
||||||
| ||||||
|
|
||||
| Das könnte Dich auch interessieren: |
|
Ted's LightSpace CMS Calibration Disk Nudgiator am 30.10.2013 – Letzte Antwort am 05.10.2015 – 24 Beiträge |
|
Lightspace vonswiss am 13.12.2019 – Letzte Antwort am 09.01.2020 – 2 Beiträge |
|
NEU ! LightSpace Home Cinema Light - bezahlbare Profi-Kalibriersoftware für 3D LUTs Nudgiator am 22.08.2013 – Letzte Antwort am 12.02.2016 – 139 Beiträge |
|
Wo finde ichTipps & Tricks zum Leinwandbau Ramiro am 13.05.2004 – Letzte Antwort am 03.06.2004 – 10 Beiträge |
|
Große, billige "Einmal-Leinwand" muppet123 am 10.03.2008 – Letzte Antwort am 25.04.2008 – 4 Beiträge |
|
Günstige große Leinwand (Eigenbau) Schumi91hsv am 14.10.2013 – Letzte Antwort am 16.10.2013 – 2 Beiträge |
|
Info Adeo Kurbelleinwand mit Seilspannung Beamer4U am 03.01.2013 – Letzte Antwort am 27.01.2013 – 3 Beiträge |
|
Beratung/Info Hochkontrastleinwandtuch für Rahmenleinwand! stupendousman am 22.10.2023 – Letzte Antwort am 16.11.2023 – 5 Beiträge |
|
Tips für Deckenmontage der Motor-Leinwand xtremer73 am 25.11.2013 – Letzte Antwort am 26.11.2013 – 5 Beiträge |
|
Keilrahmen von Boesner - Allgemeine Info für alle leon111 am 27.08.2008 – Letzte Antwort am 12.01.2009 – 32 Beiträge |
Anzeige
Produkte in diesem Thread

Aktuelle Aktion
Top 10 Threads in Leinwände, Beamerzubehör, Messtechnik & Co. der letzten 7 Tage

- Anleitung: Leinwand mit variabler Maskierung selberbauen
- Rauhfaser - eine Alternative zur Leinwand?!
- Celexon Professional Plus Enttäuschung
- Leinwand oder weiße Wand
- Knicke / Beulen im Leinwandtuch
- Motorisierte Bodenleinwand
- Rollo Leinwand mit waagrechtem Auszug?
- Helligkeit: Beziehung LUX zu cd/m² - wer kennt sich aus?
- Beamer über Spiegel senkrecht betreiben?
- Rotstich HCFR und x-rite i1 Display Pro?
Top 10 Threads in Leinwände, Beamerzubehör, Messtechnik & Co. der letzten 50 Tage

- Anleitung: Leinwand mit variabler Maskierung selberbauen
- Rauhfaser - eine Alternative zur Leinwand?!
- Celexon Professional Plus Enttäuschung
- Leinwand oder weiße Wand
- Knicke / Beulen im Leinwandtuch
- Motorisierte Bodenleinwand
- Rollo Leinwand mit waagrechtem Auszug?
- Helligkeit: Beziehung LUX zu cd/m² - wer kennt sich aus?
- Beamer über Spiegel senkrecht betreiben?
- Rotstich HCFR und x-rite i1 Display Pro?
Top 10 Suchanfragen

Forumsstatistik

- Registrierte Mitglieder930.611 ( Heute: 2 )
- Neuestes MitgliedEurozwerg
- Gesamtzahl an Themen1.563.330
- Gesamtzahl an Beiträgen21.822.325


